Table of Contents
This article contains affiliate links. If you purchase a product or service through an affiliate link of mine, I may receive a commission or incentive. There is no additional charge for you.
Kit Visual Automations (Kit was formerly known as ConvertKit) let you set up emails that send automatically based on what your subscribers do. Someone signs up for your freebie at 2am? The download link arrives immediately. Someone subscribes to your newsletter? They get your welcome sequence without you lifting a finger.
Instead of manually sending the same emails over and over, you build the workflow once and Kit handles it from there.
In this guide, I’ll show you exactly how Kit Visual Automations work and walk you through creating your first one: a simple welcome email that sends when someone subscribes to your newsletter. By the end, you’ll have a working automation running in your account and you’ll understand how to build more complex workflows when you’re ready.
New to email marketing in general? Start with my beginner’s guide to email newsletters first, then come back here.
What Are Kit Visual Automations?
Kit Visual Automations are workflows that automatically send emails and perform actions based on what your subscribers do. You build them on a visual canvas by connecting building blocks together, like connecting puzzle pieces.
The “visual” part is what I love most about Kit’s approach. You can actually see the path a subscriber takes through your automation. Everything is laid out on a canvas where you can trace exactly what fires when.
Some platforms have visual automations but make every single email a separate step, which creates massive cluttered canvases that are hard to follow. Kit strikes a better balance. You can see the structure clearly without drowning in unnecessary detail.
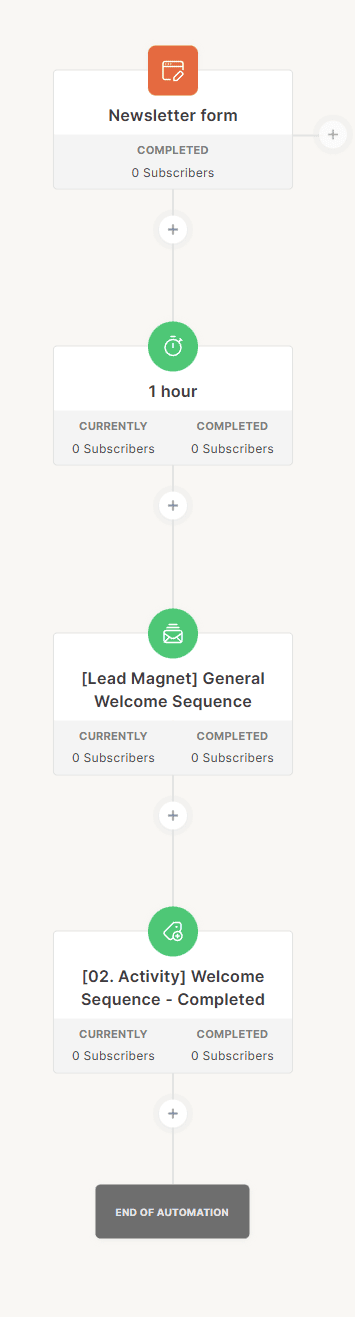
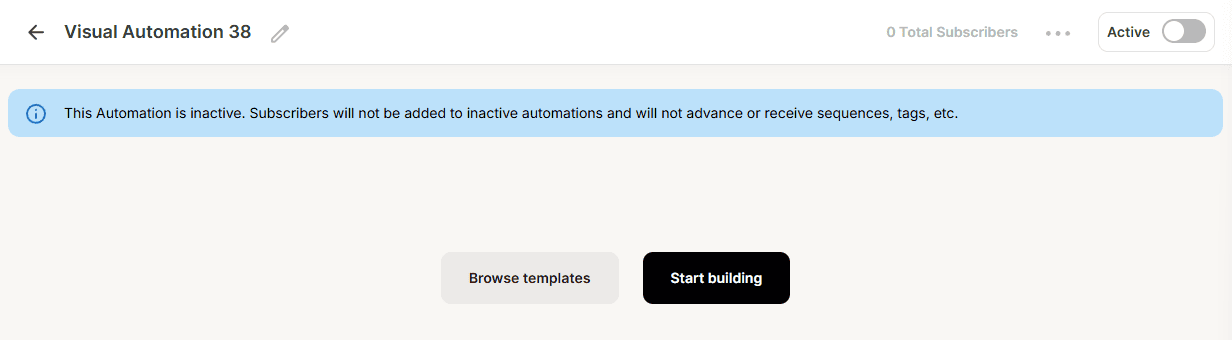
When you first create an automation, it’s inactive. Nothing happens until you turn it on. Once active, subscribers enter when they do the trigger action (like filling out a specific form). They then move through each connected block in sequence. They might wait for a set time, receive an email, get tagged, or split into different paths based on conditions you’ve set.
Think of it like creating a flowchart. You place blocks on the canvas and draw connections between them to show the order things should happen. Kit then follows that exact path for every subscriber who enters.
Each building block does one specific thing. A trigger block starts the automation when someone does a specific action (like subscribing to a form). Action blocks do things like sending emails, adding tags, or making subscribers wait for a set amount of time. Condition blocks create different paths based on whether something is true or false (like “does this person have a specific tag?”).
The Building Blocks of Kit Visual Automations
1. Triggers: What Starts the Automation
Every automation needs a trigger. This is the action that makes someone enter the automation in the first place. Without a trigger, nothing happens.
The trigger options are:
- Joins a form: Someone fills out a specific signup form (or all forms)
- Tag is added: Someone gets tagged (either by you or by another automation)
- Product purchased: Someone buys a specific product through an integration with Kit
- Custom field: A custom field changes to a specific value
You can have up to 5 triggers start an automation. For the welcome email we’re building in this guide, we’ll use “Joins a form” as the trigger.

2. Events: When Something Happens
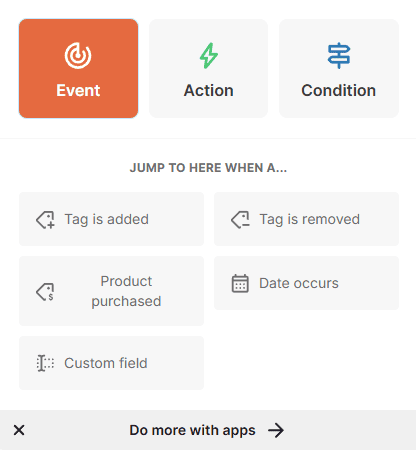
Events let you add steps to your automation based on subscriber actions. They sit between your trigger and your actions, watching for specific things to happen.
Event options include:
- Tag is added or removed:When a subscriber gets or loses a specific tag
- Product purchased: When they buy something
- Date occurs: When a specific date arrives
- Custom field: When a custom field value changes
You won’t need events for your first automation, but they become useful when you want automations that respond to what subscribers do.
3. Actions: What the Automation Does
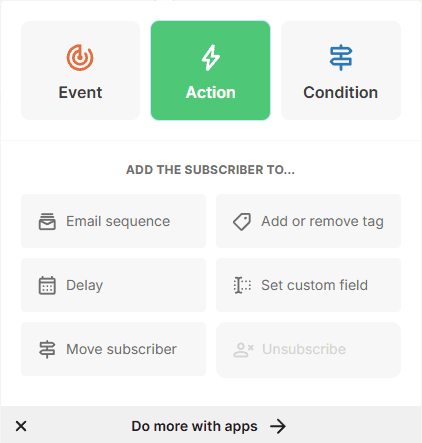
- Email sequence: Sends emails to the subscriber. This can be a single email or a series of multiple emails sent over time.
- Add or remove tag: Adds or removes a tag for tracking
- Delay: Pauses for a set amount of time before moving to the next step
- Set custom field: Updates a custom field value
- Move subscriber: Gives you the option to exit this automation, remove them from another automation or start another automation. When you move a subscriber to another automation, that becomes their entry point into that new automation.
- Unsubscribe: Removes them from your list
4. Conditions: Creating Different Paths
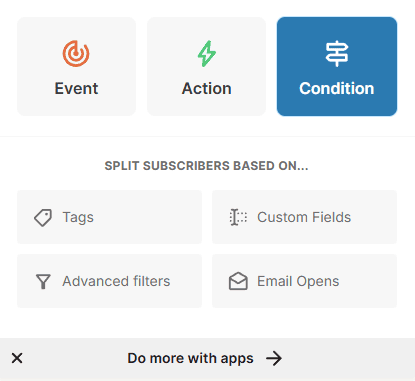
Conditions let you split subscribers into different paths based on what’s true about them. This is where automations get smarter and more personalised.
Condition options include:
- Tags: Split based on which tags they have or don’t have
- Custom Fields: Split based on custom field values
- Advanced filters: Use multiple criteria to create complex splits
- Email Opens: Split based on whether they opened specific emails
You won’t need conditions for your first simple automation, but they’re powerful once you’re ready to create workflows that adapt to different subscribers.
Building Your First Automation: A Welcome Email
Now let’s build your first automation together. We’re going to create a simple welcome email that sends automatically when someone subscribes to your newsletter.
This automation will have four parts:
- A trigger (when someone joins a form)
- A short delay (so the email doesn’t feel too instant and automated)
- An email (your welcome message)
- A tag (to track that they’ve been welcomed)
Let’s get started!
Want to try out Kit? Check out my special affiliate link below with a 30 day free trial.
Step 1: Create a New Automation
In your Kit account, click on “Automate” in the menu, then click “Visual Automations.” Click the “New Automation” button in the top right. You will see there are quite a few templates you can use, but in this case, click ‘Start from scratch’.
The automation will be called ‘Visual Automation #’. Click on the pencil next to the name, and give it a clear name like “Welcome Email” or “New Subscriber Welcome.” You can always change this later, but descriptive names help when you have multiple automations running.
Step 2: Add Your Trigger
Click on “Add trigger” in the centre of your blank canvas.
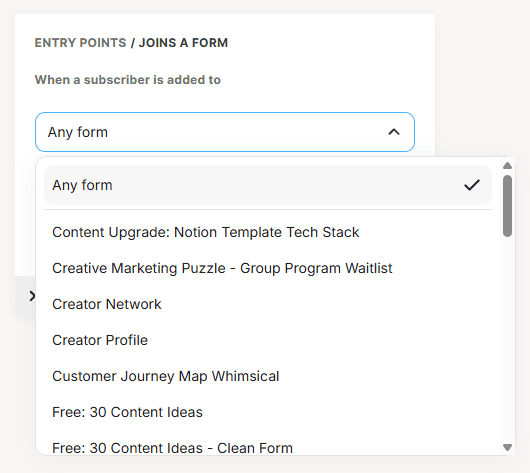
Select “Joins a form” from the trigger options.
Now choose which form should trigger this automation. You have two options:
- Any form: This welcome email will send to everyone who subscribes through any of your forms
- A specific form: Choose one particular form to trigger this automation
For this tutorial, let’s create a specific form so you can test your automation safely without affecting your whole list.
If you don’t have a test form yet, you can create one in the “Grow” section of Kit. Click on “Landing Pages & Forms,” then “New Form.” Give it a name like “Test Welcome Automation” and choose a simple template. You can find detailed instructions on creating forms in Kit’s help documentation.
Once you have your form, come back to your automation and select it from the trigger options.
Step 3: Add a Delay
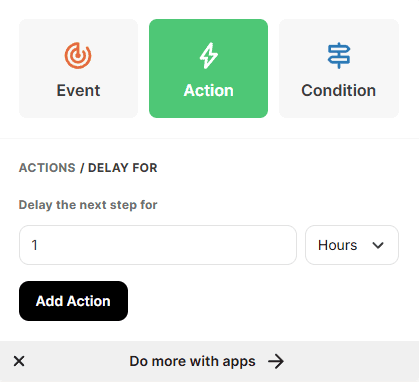
For these kind of automations, delays are optional, but to teach you how to do it, lets add a short wait of between 5 and 30 minutes.
Click the + button that appears below your trigger and select “Action,” then choose “Delay.” You can pick ‘number of days’ or ‘custom field’. We will pick ‘number of days’ for now.
However, you don’t have to only use it for days, you can also select weeks, hours or minutes (in 5-minute increments).
Step 4: Add Your Email Sequence
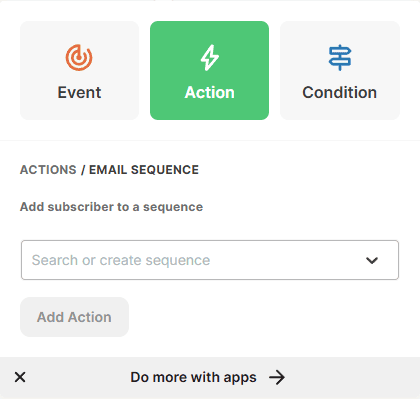
Click the + button below your delay and select “Action” again, then choose “Email sequence.”
Kit will let you type in a sequence name, if you already have one, or create one by typing in the name. Give your sequence a name like “Welcome Email” (this is just for your reference, subscribers won’t see it).
Step 5: Write Your Welcome Email
Click on the sequence block you just created, which makes you go into the sequence. You will see a first email that is clearly not meant to be sent. Let’s replace that with your welcome email.
Understanding the email editor:
Kit’s email editor has several key parts:
Subject line: This is what subscribers see in their inbox. Make it clear and welcoming.
Preview text (optional): This small text appears next to your subject line in many email clients. It’s a great place to add a little extra context.
Email body: This is where you write your actual message. You can use the formatting toolbar to add bold text, links, images, and more. Keep the formatting simple – over-designed emails often end up in spam folders.
Personalisation: You can add merge tags like {{ subscriber.first_name }} to personalise your emails. Click the “Personalize” button in the editor to see available options.
Preview and test: Before finalising, use the preview option to see how your email looks, and send yourself a test email to check it in your actual inbox.
So now let’s add your welcome email. Here’s what to include:
- A clear subject line (something like “Welcome to [Your Business Name]!”)
- A friendly greeting
- Thank them for subscribing
- Tell them what to expect from your emails (how often, what topics)
- Maybe share one helpful tip or resource
- Let them know how to reach you if they have questions
Keep it relatively short. This is a welcome, not a sales pitch. You want them to feel good about subscribing.
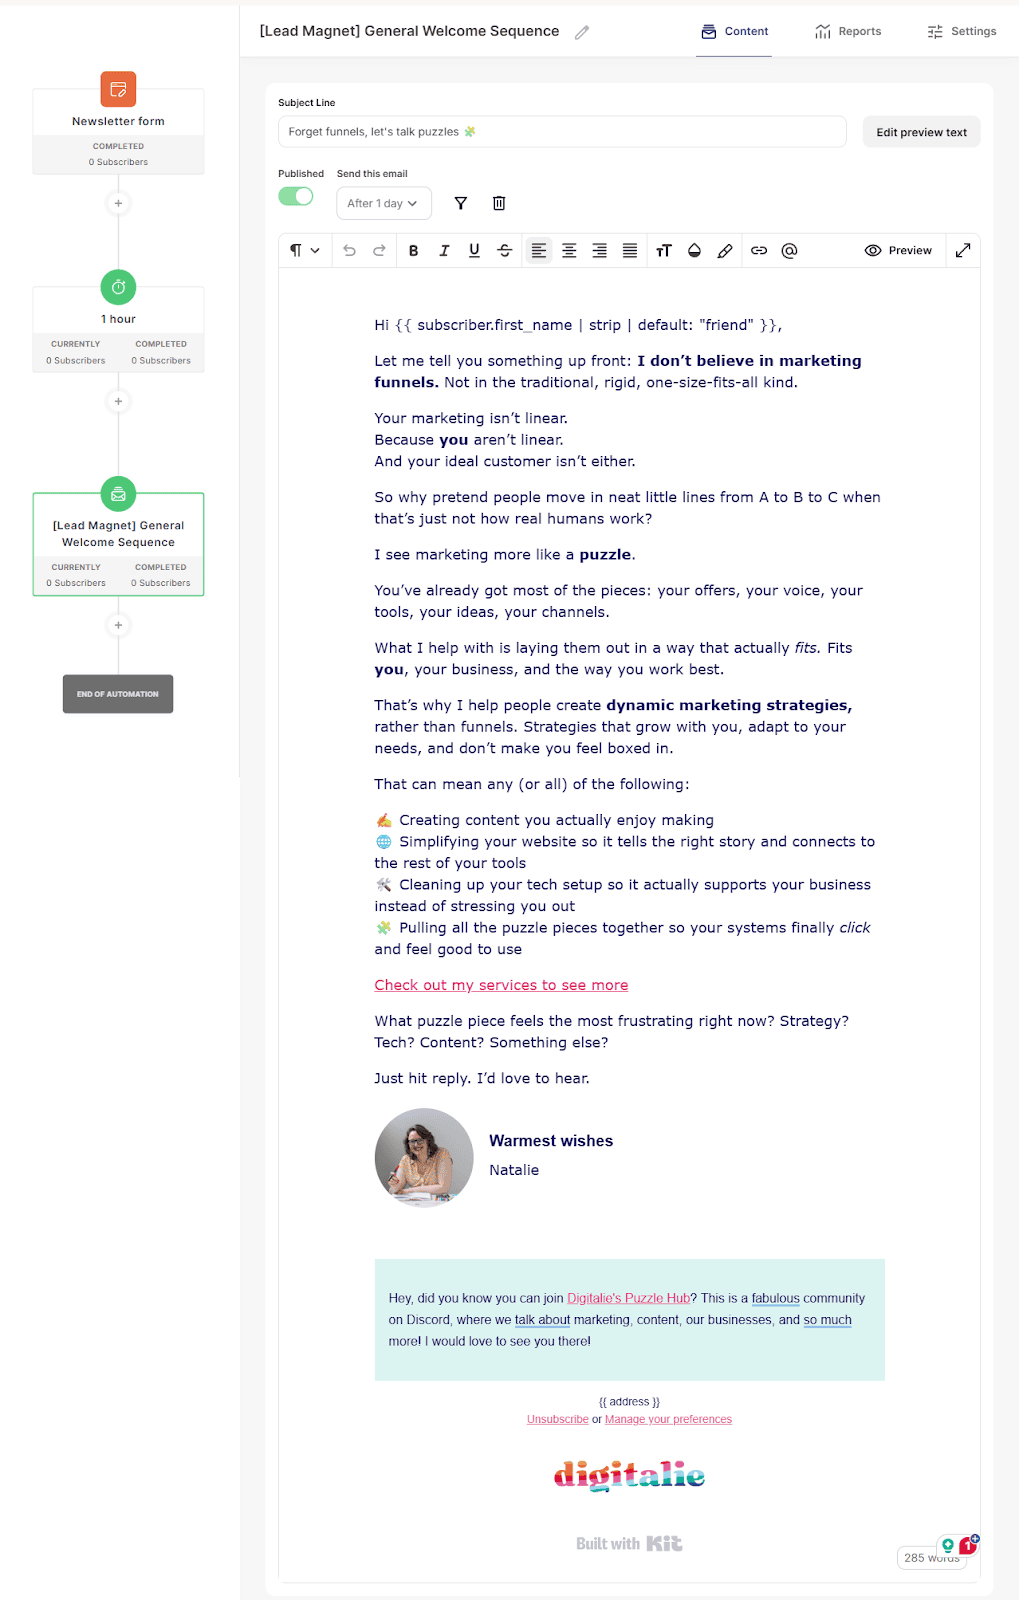
Don’t forget to publish the email! Kit might show you a warning if there are any issues (like an email without a subject line). Fix any problems it flags, then publish it.
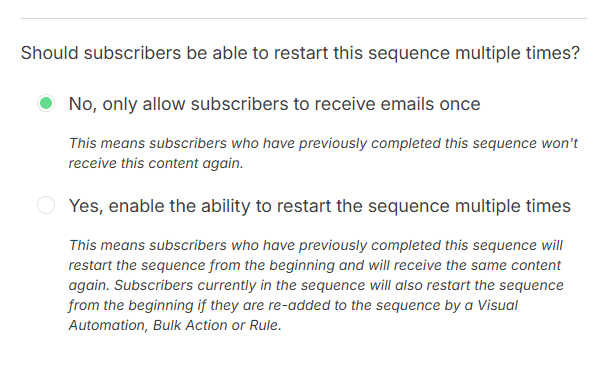
Important setting: Before you finish, click on the sequence name at the top to see the sequence settings. You’ll see an option that says “Subscribers can receive emails in this sequence” with options for “Once” or “Every time they enter.”
For a welcome email, you want “Once” selected. This means even if someone somehow triggers this automation multiple times, they’ll only receive your welcome email once. This prevents annoying duplicate emails.
Step 6: Add a Tag
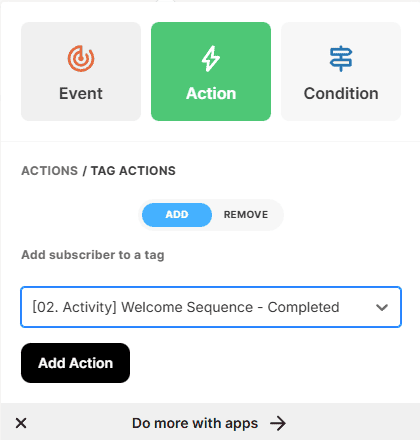
Click the + button below your email sequence and select “Action,” then choose “Add or remove tag.”
Select “Add tag” and either choose an existing tag or create a new one. Name it something clear like “Welcomed” or “Completed Welcome Sequence.”
This tag helps you track who’s been through your welcome automation. Later, you can use this tag to exclude people from getting welcomed again, or to segment your list based on who’s completed this process.
Step 7: Test and Review Your Automation
Click back to see your full automation canvas. You should now see:
- Your trigger (Joins a form)
- Your delay (30 minutes)
- Your email sequence (1 email)
- Your tag (Welcomed)
Check that everything connects properly. Each block has a line connecting it to the next block. Is the order correct?
On the top right you will find a toggle to activate the automation. Then you’ll want to test it to make sure everything works as expected first. This is crucial – you don’t want to discover problems after real subscribers start going through it.
Testing your automation:
The easiest way to test is to subscribe yourself using the form you selected as your trigger.
- Go to your test form (the one you created in Step 2)
- Click ‘embed’ and find the share link
- Open the form through the share link
- Fill it out with your own email address
- Wait for the delay period you set (in our example, 30 minutes)
- Check your inbox for the welcome email
- Verify the email looks correct and all links work
Checking if it worked:
While you’re waiting for the email to arrive, you can check if you’ve entered the automation correctly:
- Go to “Grow” then “Subscribers” in Kit
- Find your email address in the subscriber list
- Click on your subscriber record
- Scroll down to see the “Automations” section
- You should see your welcome automation listed, showing which step you’re currently at
Note: this can take a few minutes to show up.
If the email doesn’t arrive after your delay period, check these common issues:
- Is the automation actually active? (Check the toggle in the top right)
- Did you publish the email in the sequence? (Unpublished emails won’t send)
- Is the email sitting in your spam folder?
- Did you enter through the correct form?
Step 8: Share Your Form
Now that your automation is working, it’s time to let people find your form:
Embed it on your website: Go to your form in Kit, click “Share,” and copy the embed code. Paste this into your website where you want the form to appear. If you use WordPress you can also use the WordPress plugin to directly add the form wherever you want.
Share the direct link: Every form has its own URL. Copy this link and share it on social media, in your email signature, or anywhere else you want people to sign up.
Add it to your bio: If you’re promoting it on Instagram, TikTok, or other platforms with limited link options, add the form link to your bio or link-in-bio tool.
The automation will now run automatically for everyone who subscribes through your form.
Troubleshooting Your Automations
My subscribers aren't entering the automation
- Is the automation active? Look for the green “Active” toggle in the top right. If it says “Inactive,” the automation won’t run.
- Are they using the right trigger? If your trigger is “Joins a specific form,” they need to subscribe through that exact form. Subscribing through a different form won’t trigger it. But also, once they have entered through that form they won’t immediately be able to reenter a second time.
- Do they already have the tag? If you’re using “Tag is added” as a trigger and they already have that tag, adding it again won’t trigger the automation.
The email isn't sending
First, check if the email is published. Unpublished emails won’t be sent even if the automation is active. Go into your sequence and make sure each email shows as “Published” not “Draft.”
Next, check your subscriber record:
- Go to Grow > Subscribers
- Find the person who should have received the email
- Check if they have received the email and something happened to it.
Last, check the automation, do you see subscribers that are set as ‘paused’ between two steps? If so, its important to figure out why.
Can someone go through an automation twice?
Yes, unless you prevent it. By default, if someone triggers an automation again (like joining another form that uses the same trigger), they’ll enter again. That doesn’t mean they will receive the emails again though. This only happens if you’ve set it so emails can be repeated.
What happens if someone unsubscribes midway through?
Can I see who's currently in an automation?
When the automation is doing something unexpected
- Does each block connect to the right next block?
- Are there any conditions that might be splitting people in unexpected ways?
- Check if there is a ‘wait until’ condition that hasn’t been met yet. For instance, if you’ve set the automation to wait for a specific event (like a tag being added or a link being clicked), subscribers will stay at that step until the condition is true.
You're Ready to Automate
Congratulations! You’ve built your first automation and understand how the building blocks work. Now you can start creating automations that actually save you time and make your business run more smoothly.
Start with automations that solve real problems in your business. Don’t automate just because you can.
Freebie delivery automations are usually the best next step. My guide to setting up freebie automations shows you how to create a single reusable structure that works for all your freebies without duplicating work.
Purchasing follow-up automations makes sense once you’re selling products or services. Automatically send access information, onboarding details, or next steps when someone buys from you.
A few final tips:
Build one automation at a time. Test everything. Keep your automations simple enough that you can understand them six months from now. I see loads of clients that don’t understand their own setup and get stuck because of it.
Need help? Book a connection call and we can talk through how we at Digitalie can help you with the marketing automations for your specific business.